Distribution and Flavors
Sigasi Visual HDL (SVH) is distributed online. It is available in two versions: as a stand-alone application or as a plugin inside a standard Eclipse installation. Your license gives you the right to use either version, at any time, at your discretion. Therefore, your first task is to decide which version suits your requirements, based on the description below. Depending on the chosen version, you should then follow the corresponding installation instructions.
Sigasi Visual HDL (SVH)
The stand-alone application has the following characteristics:
- Recommended if you are not using Eclipse yet
- Installation is trivial: just unzip!
- Everything is included in a single download
- Well-balanced set of features
- Optimized for VHDL and Verilog development
- Complete freedom to add and configure plugins
SVH Eclipse Plugin
The Eclipse plugin has the following characteristics:
- Can be useful if you are using Eclipse already
- Easily plugged into your existing Eclipse platform
- Complete freedom to add and configure plugins
- Over one thousand other Eclipse plugins to choose from
- Support for C, C++, Tcl, and other languages
- Support for many version control systems
When updating an existing installation, you need to extra care to diasble the option Contact all update sites during install to find required software. Not doing so might break your installation.
SVH Custom Installation
- Recommended for (larger) teams
- Automates the setup of Eclipse, the SVH plugin, and your project
- Ensure that team members have a uniform setup
- Quickly set up Eclipse with SVH
- Configure team preferences during setup
- Check out a project from version control at setup time
- Optionally add support for other programming languages
The custom installation is documented in a separate section.
Installation of SVH
To download and install SVH as a stand-alone application, visit this page.
After downloading, choose or create a folder where you want to install
the software and unpack the archive there. The archive contains a
single top-level folder called sigasi. Inside the folder, there is an
application startup file, also called sigasi. Start the application by
executing this startup file.
If you are using Red Hat Linux 6 or CentOS 6, you need to follow the Plugin installation instructions as explained here.
Running SVH with multiple users on the same server
The following section is only relevant if you’re using a Sigasi Studio version older than Sigasi Studio 4.17.2.
Starting with Sigasi Studio 3.8, the Sigasi launcher listens on port 4444. To avoid conflicts on this port when SVH is used on a server with multiple users concurrently, the following changes need to be made:
- Edit
sigasi/configuration/config.iniand replaceeclipse.application=com.sigasi.runner.openwitheclipse.application=org.eclipse.ui.ide.workbench - In
sigasi/sigasi.iniadd following lines between@noDefaultand-vmargs:
--launcher.defaultAction
openFile
- If there are other arguments between
@noDefaultand-vmargs, append to these.
@noDefault
-vm
plugins/org.eclipse.justj.openjdk.hotspot.jre.full.<version>/jre/bin
--launcher.defaultAction
openFile
-vmargs
This way SVH uses the default Eclipse behavior instead of the custom Sigasi runner.
The Sigasi runner allows you to open projects using the -p option.
This is not possible when using the default Eclipse runner.
Installation of SVH Eclipse Plugin
There are two ways to install the SVH Eclipse Plugin:
Prerequisites: Java Runtime
- The SVH plugin requires Java 17.
- You can check your Java version with
java -version - Java can be downloaded from several sources, a.o. Adoptium .
Prerequisites: Eclipse

- You need to have at least Eclipse version 2023-03 (4.27).
- This Eclipse version and the SVH plugin require Java 17.
- If you don’t have Eclipse installed yet, the C/C++ flavor would be a good place to start. Just download (Windows 64 bit /Linux 64 bit /Other versions ), unzip, and start.
- We recommend you also increase the heap size for Eclipse.
For more information on system requirements: System Requirements
Install the Eclipse Plugin
This requires the host where you install the SVH Plugin to have access to our download server. After starting Eclipse:
- Click Help > Install New Software….
- In the Work with: field enter
https://download.sigasi.com/sigasi-studio/updates/studioand press enter. - Check the checkbox next to SVH.
- Since Sigasi Studio 4.15, installing optional features is no longer recommended.
- You must disable the option Contact all update sites during install to find required software when installing the plugin.
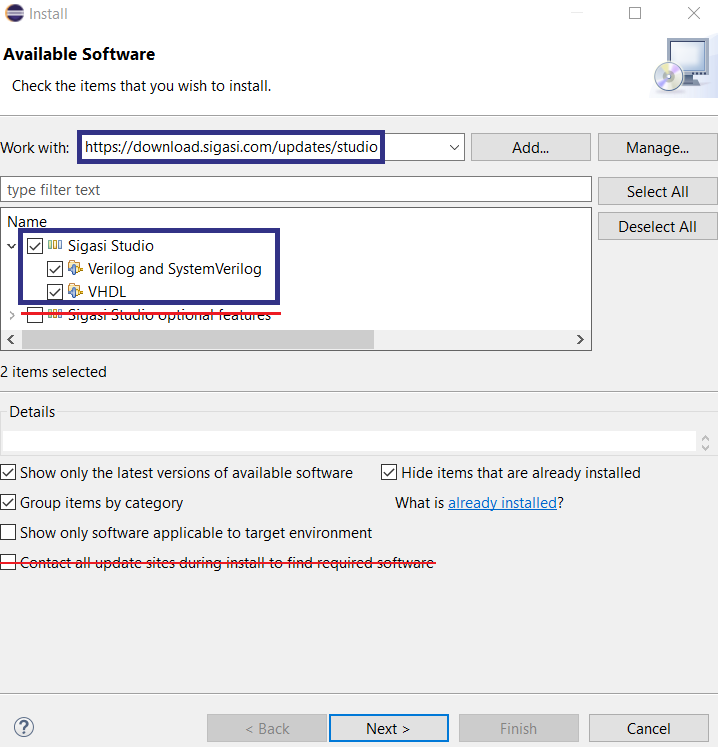
- Click the Next button.
- The following steps are pretty self-explaining.
- After the installation, you will need to restart Eclipse. Once this is done, go to Window > Perspective > Open Perspective > Other… and select the Sigasi Perspective. You can then close the Welcome View to show the Sigasi Views.
Installing the Offline Update Site
Installing the offline update site is very similar to installing from the main update site, where step 2 is replaced with these steps:
- Download the offline update site
- In the Install Wizard, click Add…
- Click Archive…, browse to the zip file you downloaded, and confirm with OK.
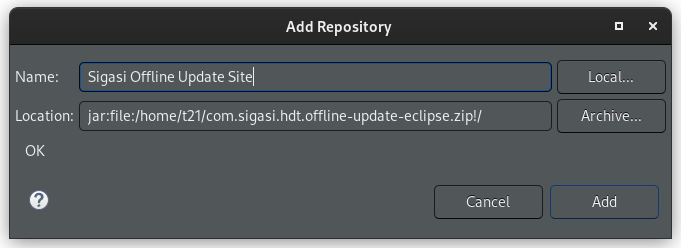
Next, continue with step 3. in the general eclipse installation instructions. It is recommended to disable the option Contact all update sites during install to find required software when installing update sites.
GPG Certificate Validation
Eclipse 4.26 (2022-12) added GPG certificate checking capabilities. When you install new plugins, you will be prompted to trust any not-yet-trusted GPG keys or unsigned artifacts. Because Sigasi artifacts are correctly signed using GPG, you can expect to see the following screen the first time you install or update Sigasi in an Eclipse >= 4.26.

Previously trusted keys can be inspected by going to Window > Preferences > Install/Update > Trust.

You can refer to this page for all information regarding GPG at Sigasi.
Licensing
The license key can be filled in under Window > Preferences > Sigasi > License Key.
More details can be found here. The license unlocks the features for your edition.
Configuration
SVH stores its projects on the file system in one or more workspaces.
When you start the tool for the first time, it will propose to create a workspace for you:
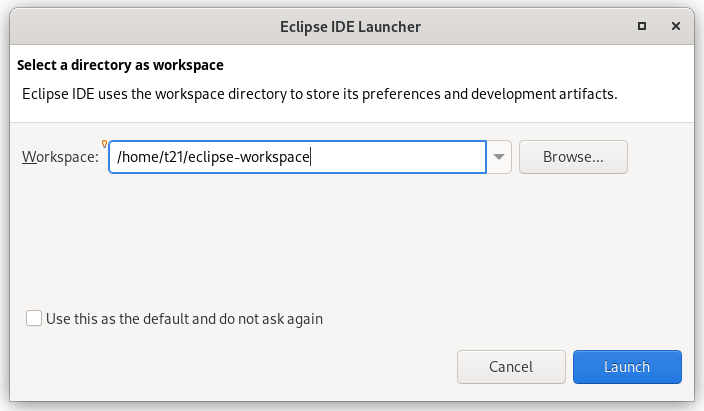
Although you can work with multiple workspaces, we recommend using a single workspace for all your projects.
Software Updates
SVH has an automated update system. When updates are available, you are notified by a pop-up window called Updates Available in the bottom right corner:

If you want to install the updates, click anywhere in the pop-up window. After a few seconds, a new window will appear with further instructions.
The updates can be postponed by closing the pop-up. You can perform the
updates at any time by clicking the
![]() -icon in the status bar
at the bottom of the screen.
-icon in the status bar
at the bottom of the screen.
It is good practice to first create a backup of your installation folder before running an update. This can be done by simply compressing the eclipse or the sigasi folder in an archive (zip file)
Update SVH
If you run SVH as a standalone application, the automated update system will periodically check for software updates.
Update SVH Eclipse plugin
If you run SVH as an Eclipse plugin, you may need to check for updates manually, by clicking Help > Check for Updates.
You can enable automatic updates by opening this preference page: Install/Update > Automatic Updates. Next, enable Automatically find new updates and notify me. Feel free to modify any of the available options.
Firewalls and Proxies
If the updates are not automatically fetched from the SVH update server you are probably behind a firewall or proxy server. You can configure SVH’s proxy settings in Window > Preferences > General > Network connections. Make sure to set the Active Provider to Manual and configure the appropriate Proxy entries. Whether you need to configure the entries for HTTP or HTTPS depends on the Locations configured in the Available Software Sites settings.
If you can not add a firewall exception for our update site, the fallback solution is to download the complete application from our website.
You can completely replace your old installation; all settings are stored in your workspace (the default is workspaceSigasi in your home directory).