Since the Sigasi 2025.3 release, the CLI feature is included with the Sigasi VS Code extension bringing the functionality right at your fingertips in your personal VS Code terminal.
If you prefer to use the CLI feature without installing VS Code, you can download it here. Note that this standalone feature only provides command-line functionality, it does not provide the full capabilities of the Sigasi VS Code extension.
Requirements
License
In order to use the Sigasi CLI feature standalone, you will need an Enterprise (CI) license. Note that the Enterprise license used by the Sigasi VS Code extension is not compatible with the standalone CLI.
The license can be configured by either:
- A license file in your home directory, named
.sigasi.lic - Using an environment variable:
SIGASI_LM_LICENSE_FILELM_LICENSE_FILE
License status is enforced per feature: a command that needs a licensed feature fails with exit code 7 if the license does not cover it.
For more information about licenses, please refer to our manual.
Installation
To install Sigasi CLI, obtain a build ZIP for your operating system and extract it.
Then, use either sigasi-cli (Linux) or sigasi-cli.bat (Windows).
Usage
sigasi-cli [COMMAND] [ARGUMENTS]Help
You can get usage information by adding the --help or -h flag.
You can also use this flag for each command to get usage information for those commands specifically.
$ sigasi-cli --help
Usage: sigasi-cli [OPTIONS] [COMMAND]
Sigasi CLI.
  -h, --help      Show this help message and exit.
  -V, --version   Print version information and exit.
  -v, --verbose   Log informational messages to stderr. Place before the
                    command, e.g. 'sigasi-cli -v verify ...'.
      --debug     Log debug messages to stderr. Place before the command, e.g.
                    'sigasi-cli --debug verify ...'.
Commands:
  compilation-order       Export project compilation order.
  compilation-recipe      Export project compilation recipe.
  document                Export project documentation.
  extract                 Extract a library or all tool libraries to a library
                            database.
  format                  Format VHDL files.
  list-targets            List Modular project targets.
  verify-target-commands  Validate the Modular project target commands.
  verify                  Validate the project.
  daemon                  Inspect or control the Sigasi CLI daemon.
Logging Options
To turn on verbose output, use any of the following flags. The extra messages will be logged to stderr.
| Option | Description |
|---|---|
--verbose | -v | basic progress reporting |
--debug | debug information |
Verify
The verify command allows you to check an entire Sigasi project for issues.
Issues can be reported in different formats, such as plain text, JSON, or XML.
$ sigasi-cli verify --help
Usage: sigasi-cli verify [OPTIONS] PROJECT
Validate the project.
      PROJECT                Path of a project root folder.
  -t, --target=<targetName>  Scope the command to a target for a Modular
                               project. Can be used multiple times.
  -h, --help                 Show this help message and exit.
  -V, --version              Print version information and exit.
Project Options:
  -P, --path=<key=value>     Sets a custom path variable for a Classic project.
                               Can be used multiple times.
  -D, --library-database, --dependencies-path=<directory>
                             Directory to search for project dependencies or a
                               library database. Can be used multiple times.
Output Options:
  -o, --out=FILE             File to write the output to.
  -a, --absolute             Use absolute paths to refer to files instead of
                               Sigasi project paths.
      --plain                Output in plain format.
      --json                 Output in JSON format.
      --sonarqube            Output in SonarQube generic issue format
                               (SonarQube 10.3+; renders in both Standard
                               Experience and Multi-Quality Rule mode).
      --sonarqube-pre-10.3   Output in the legacy SonarQube generic issue
                               format, for SonarQube servers older than 10.3.
      --warnings-ng          Output in Warnings NG XML format.
Execution Options:
      --fail-on-error        Fail on any error marker.
      --fail-on-warning      Fail on any warning or error marker.
      --fail-on-info         Fail on any info, warning, or error marker.
      --include-suppressed   Include suppressed issues in output.
Project Options
Environment Variables
Sigasi projects sometimes use environment variables to point at external files and folders, e.g., at the location of your VUnit installation. These variables are set in the IDE, but Sigasi CLI is not aware of these variables by default. Also, the environment in which you run CLI (e.g., your CI server) may be different from the environment in which you run Sigasi. For example, VUnit may be installed in a different location in each environment.
Using -P or --path, you can specify the value of the different
PATH variables in your .project file. For example, if your
.project file contains a linked folder like this:
<link>
        <name>Common Libraries/vunit_include</name>
        <type>2</type>
        <locationURI>VUNIT/verilog/include</locationURI>
</link>
You can set the VUNIT variable to the path of your VUnit installation:
$ sigasi-cli verify --path=VUNIT=/path/to/vunit/installation [FURTHER OPTIONS]You can use -P or --path multiple times to specify the value of
multiple PATH variables.
Note that Sigasi CLI does not support resource filters in the .project file.
Common Third-Party Libraries
Sigasi projects can also use third-party libraries from the Library Database. Refer to the extract command documentation and Sigasi dependencies manual for more information about the Library Database.
With the -D or --library-database option, you can specify the path to a Library Database
that contains these libraries.
Output Options
Output to file
To save the output to a file, you can use one of the output options (--out or -o) or, on Linux, redirect the output using >.
$ sigasi-cli verify -o markers.txt .
$ sigasi-cli verify --out=markers.txt .
$ sigasi-cli verify . > markers.txt
Absolute paths
By default, the file paths of the files with issues will be given as Sigasi project paths.
This makes it easy to find the relevant file in Sigasi and fix the problem,
because these are path relative to the project root.
When the output of the verify command is to be processed by a script, though,
Sigasi project paths are usually not what you want,
especially if your project contains a lot of linked resources.
Much easier to work with are absolute paths,
which you’ll get when you pass the --absolute flag.
Output formats
| Format | Description |
|---|---|
| default | colored, suitable for terminal |
--plain | colorless |
--json | JSON format, more detailed |
--sonarqube | JSON format for SonarQube Server 10.3 or later |
--sonarqube-pre-10.3 | JSON format for SonarQube Server < 10.3 |
--warnings-ng | XML format for Warnings NG |
Plain
By default, the verify command will output a single line of information for each issue found.
This includes the path, line, and column where the issue is located, the severity, and a message.
If you want to use this format but without coloring, you can use the --plain flag.
hdl/boards/vfc/rtl/IRQ_Generator_Top.vhd:147:17: WARNING: Incorrect array size in assignment: expected (<g_wb_data_width>) but was (<64>)
hdl/boards/vfc/rtl/IRQ_Generator_Top.vhd:155:21: WARNING: Incorrect array size in assignment: expected (<32>) but was (<g_wb_data_width>)
hdl/boards/vfc/rtl/IRQ_Generator_Top.vhd:156:17: WARNING: Incorrect array size in assignment: expected (<32>) but was (<g_wb_data_width>)
hdl/boards/vfc/rtl/IRQ_Generator_Top.vhd:157:17: WARNING: Incorrect array size in assignment: expected (<g_wb_data_width>) but was (<32>)
hdl/boards/vfc/rtl/IRQ_Generator_Top.vhd:158:17: WARNING: Incorrect array size in assignment: expected (<g_wb_data_width>) but was (<32>)
hdl/boards/vfc/rtl/IRQ_Generator_Top.vhd:192:10: WARNING: The order of the associations is different from the declaration order
hdl/boards/vfc/rtl/IRQ_Generator_Top.vhd:202:10: WARNING: The order of the associations is different from the declaration order
hdl/boards/vfc/rtl/IRQ_generator.vhd:117:10: WARNING: The order of the associations is different from the declaration order
hdl/boards/vfc/rtl/IRQ_generator.vhd:123:10: WARNING: The order of the associations is different from the declaration order
...
JSON
If you want more detailed information for each issue, you can use the JSON output format by using the --json flag.
{
  "project": "vme64x-core",
  "issues": [
    {
      "resource": "hdl/boards/vfc/rtl/IRQ_Generator_Top.vhd",
      "library": "work",
      "description": "Incorrect array size in assignment: expected (<g_wb_data_width>) but was (<64>)",
      "line": 147,
      "lineEnd": 147,
      "column": 17,
      "columnEnd": 37,
      "severity": "WARNING",
      "code": "com.sigasi.hdt.vhdl.Vhdl.144",
      "codeDescription": "Array assignment validation",
      "category": "Range validation"
    }
  ]
}
SonarQube
To import issues into SonarQube , use the --sonarqube flag to output issues in a format that can be interpreted by SonarQube. Use the --sonarqube-pre-10.3 flag instead if your SonarQube server still uses the old generic issue format. First output the issues into a file, then pass them to SonarQube by adding the sonar.externalIssuesReportPaths parameter. More info can be found here .
Warnings NG
Additionally, issues can be formatted in an XML format suitable for the Jenkins plugin Warnings NG by using the --warnings-ng flag.
This allows for output to be fed to the plugin, which will visualize the issues for each Jenkins run.
You can do so by adding the following to your Jenkinsfile:
// Specify the path of your Sigasi CLI installation
final String sigasi_cli = "/opt/sigasi-cli/sigasi-cli"
// ...

// Add the following somewhere in your build step
sh "${sigasi_cli} verify --warnings-ng --out sigasi-issues.xml ."
// ...

// Add this to your 'post' step
recordIssues(
    enabledForFailure: true, aggregatingResults: true,
    recordIssues tool: issues(pattern: 'sigasi-issues.xml', analysisModelId: 'sigasi')
)
Execution Options
Failure thresholds
To easily check if any issues of a certain severity were found in the project (without having to parse the output), you can use one of the following options:
| Option | Threshold |
|---|---|
--fail-on-error | Any error markers |
--fail-on-warning | Any error or warning markers |
--fail-on-info | Any error, warning, or info markers |
If any issue was found that matches the threshold, an exit code of 16 will be returned once finished.
The project is still validated in its entirety, regardless of whether the threshold was reached.
Suppressed issues
Suppressed issues are filtered from the output by default, as we consider these issues ‘resolved’.
If you do want to include suppressed issues in the output, add the --include-suppressed option:
$ sigasi-cli verify --include-suppressed .
Note that this option is ignored when using the --sonarqube or --warnings-ng format.
Modular Project Options
When verifying a Modular project, the --target=<target> option can be passed once or multiple times to limit reported issues to the selected targets.
Document
The document command allows you to create documentation for a Sigasi project.
The documentation can include problem information and generated diagrams and can be split into pages.
$ sigasi-cli document --help
Usage: sigasi-cli document [OPTIONS] PROJECT
Export project documentation.
      PROJECT                Path of a project root folder.
  -h, --help                 Show this help message and exit.
  -V, --version              Print version information and exit.
Project Options:
  -P, --path=<key=value>     Sets a custom path variable for a Classic project.
                               Can be used multiple times.
  -D, --library-database, --dependencies-path=<directory>
                             Directory to search for project dependencies or a
                               library database. Can be used multiple times.
Export Options:
  -t, --target=<targetName>  Scope the command to a target for a Modular
                               project. Can be used multiple times.
      --top-level=<topLevelQualifiedName>
                             Export documentation for the given qualified name.
      --diagrams=<diagramHandling>
                             Specify whether or how to include diagrams in
                               output. Defaults to embedded diagrams. The
                               following options are available:
                             EMBEDDED: include diagrams and embed them in HTML
                               files (default).
                             LINKED: include diagrams and write them to
                               separate file which is linked in HTML file.
                             NONE: don't include diagrams.
      --include-problems     Include problem information in output.
      --include-suppressed   Include suppressed problems in output.
      --design-units-per-page=<unitsPerPage>
                             Split into multiple pages with the given design
                               units per page.
      --diagram-node-limit=<diagramNodeLimit>
                             Maximum number of nodes in diagrams. Modifying
                               this limit might result in slow diagram
                               generation. Defaults to 12000.
  -T, --threads=<threads>    Number of parallel export threads. Defaults to
                               maximum available.
  -d, --output-directory=<outputDirectory>
                             Directory to write documentation files to.
                               Defaults to PROJECT/sigasi-doc.
      --[no-]include-version Include Sigasi version in output.
      --include-revision[=<revisionText>]
                             Include revision date in output. A custom revision
                               text can be passed as an argument, otherwise
                               defaults to 'Revision YYYY-MM-DD'.
Project Options
These are the same as the project options for the verify command.
Export Options
Choosing a Top Level
You can export the documentation for a given top level qualified name using --top-level=qualified.name. For example: --top-level=work.entity.architecture.
Diagram Generation
By default, diagrams are included as embedded SVGs in the generated documentation.
This can be changed to generate separate files that are linked into the HTML using --diagrams=linked.
It can also be disabled using --diagrams=none.
If the project root contains a file named sigasi-doc.css it will be copied to the target folder and
included in the HTML, embedded or linked according to the --diagrams value.
Diagram generation is multithreaded by default, this can be adjusted using -T or --threads.
Problem Information
Problem information is not included by default in the generated documentation. It can be added using --include-problems.
Suppressed problems can also be added with the additional flag --include-supressed.
Paged Documentation
The documentation can also be split into multiple pages with the option --design-units-per-page=unitsPerPage.
The summarized project information is on the first page. Subsequent pages provide more detailed insights about a limited
amount of design units per page, as specified.
Node Limit
You can configure an upper limit to the number of nodes in a diagram. This limit prevents large diagrams from being rendered. By default, it is set to 12000.
Changing Output Directory
The folder where you want to export the documentation can be set with the option --output-directory. By default, it is exported into the sigasi-doc folder of the selected project.
Include Revision Information
By default, Sigasi will add the date of the export as revision information for the documentation. You can change that text using --include-revision=<yourRevisionText>
Include Sigasi’s Version
You can configure whether Sigasi’s version is in the exported documentation by using --[no-]include-version
Target Selection
For a Modular project with multiple targets,
the --target option can be used to scope the command to a single target.
This option can be passed multiple times to export documentation for each of the specified targets.
Compilation Order
The compilation-order command allows you to generate a CSV file of all HDL files in your project, sorted in the correct compilation order.
$ sigasi-cli compilation-order --help
Usage: sigasi-cli compilation-order [OPTIONS] PROJECT
Export project compilation order.
      PROJECT              Path of a project root folder.
  -h, --help               Show this help message and exit.
  -V, --version            Print version information and exit.
Project Options:
  -P, --path=<key=value>   Sets a custom path variable for a Classic project.
                             Can be used multiple times.
  -D, --library-database, --dependencies-path=<directory>
                           Directory to search for project dependencies or a
                             library database. Can be used multiple times.
Export Options:
  -o, --out=<outputPath>   Output file. Default: PROJECT/compilation_order.csv
                             or PROJECT/toplevel_order.csv.
      --top-level=<topLevelQualifiedName>
                           Export compilation order with given qualified name
                             as top level.
  -t, --target=<targetName>
                           Scope the command to a target for a Modular project.
Project Options
These are the same as the project options for the verify command.
Export Options
By default, the compilation order is written into compilation_order.csv in the root folder of the selected project. You can export the documentation for a given top level qualified name using --top-level=qualified.name (e.g. --top-level=work.entity.architecture).
Adding this option will generate the compilation order list in a file named toplevel_order.csv. To save the output to a specific file, you can use either -o or --out.
Modular Project Options
By default, the compilation order of a Modular project will contain the compilation order for all targets.
With the --target option, only files included in any of the (one or more) specified targets will be printed.
For projects with a complicated setup,
the same file may occur in multiple targets with e.g. a different library mapping or preprocessor configuration.
Working with this output in downstream script could be more complicated than required.
To get a result that’s easier to work with,
you can pass the --target option once or more to this command.
By specifying a single target, or multiple orthogonal targets,
you can avoid duplicate files in the output.
When passing a top level qualified name using --top-level,
the command may also request you to pass a --target option
to disambiguate the top level if it occurs in multiple targets.
Compilation Recipe
The compilation-recipe command allows you to create a machine-readable json file that contains the compilation order and all compilation details, such as library mapping, language levels and SystemVerilog preprocessor defines.
$ sigasi-cli compilation-recipe --help
Usage: sigasi-cli compilation-recipe [OPTIONS] PROJECT
Export project compilation recipe.
      PROJECT              Path of a project root folder.
  -h, --help               Show this help message and exit.
  -V, --version            Print version information and exit.
Logging Options:
  -v, --verbose            Output more to the console.
      --debug              Output debug information to the console.
Project Options:
  -P, --path=<key=value>   Sets a custom path variable for a Classic '.
                             Project' definition. Can be used multiple times.
  -D, --library-database, --dependencies-path=<directory>
                           Directory to search for project dependencies or a
                             library database. Can be used multiple times.
Export Compilation Recipe Options:
  -o, --out=<file>         Output file. Defaults to stdout.
      --[no-]project-relative
                           Output paths relative to the project root.
      --top-level=<qualifiedName>
                           Export Compilation Recipe with given qualified name
                             as Top Level.
Project Options
These are the same as the project options for the verify command.
Export Options
- You can specify the output file with the option
--out. - Whether file paths should be relative to the project directory with
--project-relative, if not provided, then it defaults to use absolute paths. - You can export the compilation recipe for a given top level qualified name using
--top-level=qualified.name(e.g.--top-level=work.entity.architecture).
Extract
The extract command allows you to extract tool libraries or standalone libraries into the Library Database.
These libraries can then be used in your projects. Refer to the Sigasi dependencies manual
for more information about the Library Database.
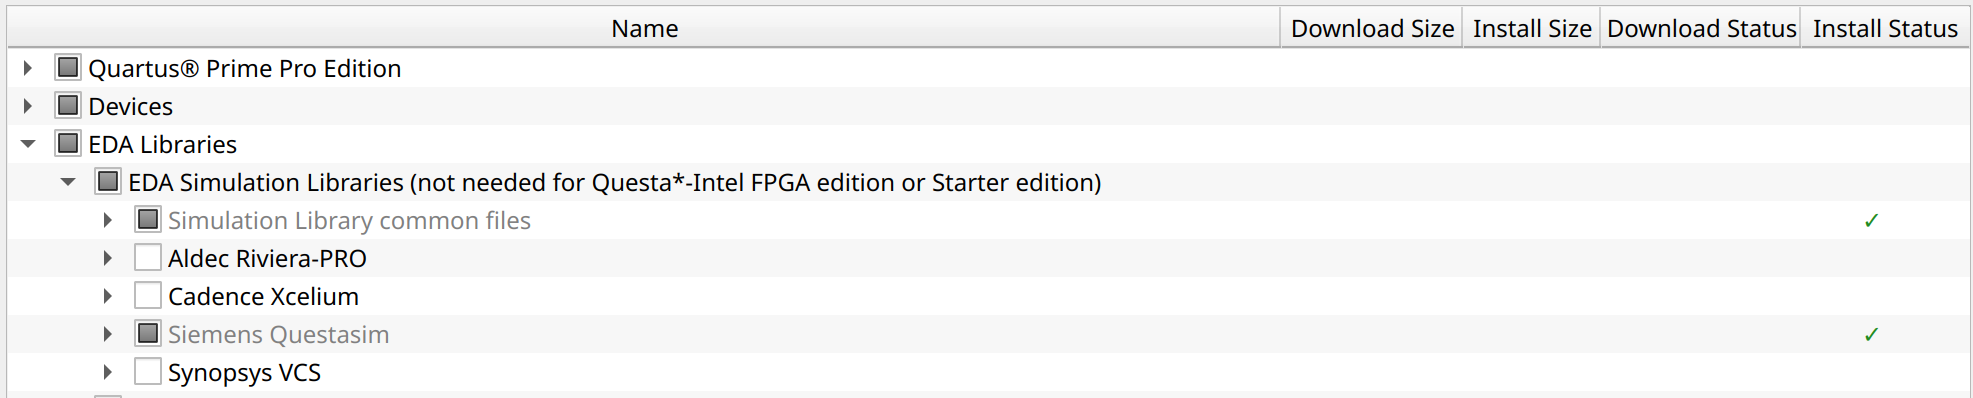
Starting with Quartus Prime Pro 25.1, the EDA simulation libraries are no longer installed by default. Without them, Sigasi cannot extract any HDL content from your Quartus installation. Use the Quartus installer to install the EDA Simulation Libraries for at least one simulator, preferably Questa, before extracting.
$ sigasi-cli extract --help
Usage: sigasi-cli extract [OPTIONS]
Extract a library or all tool libraries to a library database.
  -k, --kind=<kind>     Supported tool name (Quartus, Vivado), library name
                          (UVVM, UVM), or a custom library name.
  -a, --alias=<alias>   Alias for this tool or library instance. This alias can
                          be used in a project configuration to switch between
                          different versions of a tool or library.
  -p, --path=<toolOrLibrary>
                        Path of a tool or library directory to extract from.
  -D, --library-database=<database>
                        Path of a library database folder.
  -h, --help            Show this help message and exit.
  -V, --version         Print version information and exit.
Logging Options:
  -v, --verbose         Output more to the console.
      --debug           Output debug information to the console.
Examples:
  sigasi-cli extract --kind=Quartus --alias=24.1 \
                     --path=/opt/intelFPGA_pro/24.1/quartus \
                     --library-database=/opt/sigasi-libraries

  sigasi-cli extract --kind=UVM --alias=1800.2-2020-2.0 \
                     --path=/opt/uvm/1800.2-2020-2.0 \
                     --library-database=/opt/sigasi-libraries

  sigasi-cli extract --kind=mylib --alias=v0.1 \
                     --path=/opt/mylib_v0.1 \
                     --library-database=/opt/sigasi-libraries
Extract Options
The following information should be provided to extract libraries:
- What should be extracted: if it’s a tool, specify which kind of tool it is; if it’s a library, specify which kind of library it is.
- The alias that will be used in projects to identify exactly this version of a tool or a library.
- The path where this tool or library is located.
- The path to a Library Database where libraries should be extracted to.
Format
The format command allows you to format one or more VHDL files.
$ sigasi-cli format --help
Usage: sigasi-cli format [OPTIONS] FILE...
Format VHDL files.
      FILE...               One or more VHDL files to format.
      --vhdl-version=<vhdlVersion>
                            VHDL version: 93, 2002, 2008, 2019
      --verbose             Print formatting progress.
      --preserve-newlines   Preserve newlines
      --[no-]align          Align code. Turned on by default.
      --keywords=<keywordCasing>
                            Keyword casing: uppercase, lowercase, ignore
      --comment-align-column=<column>
                            Alignment column for trailing comments
      --spaces-for-tabs     Insert spaces for tabs
      --tab-width=<tabWidth>
                            Tab width
  -o, --out=<outputPath>    When invoked with one FILE, write output to this
                              path instead of FILE.
  -h, --help                Show this help message and exit.
  -V, --version             Print version information and exit.
Formatting options
The formatter can decide to join or split lines. Pass
--preserve-newlinesto prevent this.The formatter will attempt to align parts of the declaration of generics, ports, etc. Pass
--no-alignto keep all parts to the left.VHDL-- Default behaviour entity CORE is Port(SYS_CLK : in STD_LOGIC; CONTROL : in STD_LOGIC_VECTOR(1 downto 0); KEY : in STD_LOGIC_VECTOR(79 downto 0); IV : in STD_LOGIC_VECTOR(79 downto 0); KEY_OUT : out STD_LOGIC); ... end CORE; -- When passing --no-align entity CORE is Port(SYS_CLK : in STD_LOGIC; CONTROL : in STD_LOGIC_VECTOR(1 downto 0); KEY : in STD_LOGIC_VECTOR(79 downto 0); IV : in STD_LOGIC_VECTOR(79 downto 0); KEY_OUT : out STD_LOGIC); ... end CORE;Using
--keywords=uppercaseor--keywords=lowercasewill rewrite keywords in the specified case. The default--keywords=ignorewill retain the existing casing.The column on which to align trailing comments can be specified with
--comment-align-column. Note that comments are aligned by default, but not when--no-alignis passed.VHDL-- by default, the formatter aligns comments at column 40. entity counter is Port(clk : in std_logic; -- clock rst : in std_logic; -- reset counter to 0 i : in std_logic; -- should clock cycles be counted c : out std_logic_vector(7 downto 0)); -- counted cycles end counter; -- with --comment-align-column=50, all of the port comments in this example line up entity counter is Port(clk : in std_logic; -- clock rst : in std_logic; -- reset counter to 0 i : in std_logic; -- should clock cycles be counted c : out std_logic_vector(7 downto 0)); -- counted cycles end counter;Using
--spaces-for-tabsinstruments the formatter to replace all indentation tabs with spaces (by default they are left as is). If you don’t set the tab width to, e.g., 8 with--tab-width=8, each tab will be replaced with 4 spaces.--vhdl-version=2019sets the VHDL version used to parse the VHDL file to VHDL 2019. Other supported versions are93,2002and2008(the default).--out=/path/to/filewrites the formatted VHDL code to the specified file, instead of modifying the input file. Note that this option is only accepted when a single VHDL file is passed.
Modular Project Commands
Sigasi CLI includes two tools to help debug and analyze Modular Projects: list-targets and verify-target-commands. Refer to the Modular Project targets section for more details.
List Targets
The list-targets simply lists all targets in the project.sigasi file of the given project, to help with scripting.
$ sigasi-cli list-targets --help
Usage: sigasi-cli list-targets [OPTIONS] PROJECT
List Modular project targets.
      PROJECT              Path of a project root folder.
  -h, --help               Show this help message and exit.
  -V, --version            Print version information and exit.
Project Options:
  -P, --path=<key=value>   Sets a custom path variable for a Classic project.
                             Can be used multiple times.
  -D, --library-database, --dependencies-path=<directory>
                           Directory to search for project dependencies or a
                             library database. Can be used multiple times.
Verify Target Commands
The verify-target-commands tool executes the target commands defined in the project.sigasi file and reports any issues encountered during execution. These may include unrecognized flags, incorrect option usage, or even infinite loops in build scripts. Refer to the Modular Project command section for more details.
$ sigasi-cli verify-target-commands --help
Usage: sigasi-cli verify-target-commands [OPTIONS] PROJECT
Validate the Modular project target commands.
      PROJECT     Path of a project root folder.
  -h, --help      Show this help message and exit.
  -V, --version   Print version information and exit.
Project Options:
  -D, --library-database, --dependencies-path=<directory>
                  Directory to search for project dependencies. Can be used
                    multiple times.
Daemon
The daemon command runs a background process that keeps your project loaded between CLI invocations.
The first invocation takes as long as a normal run, but subsequent invocations are significantly faster because the project is already built and only incremental changes need to be processed.
$ sigasi-cli daemon --help
Usage: sigasi-cli daemon [-hV] [COMMAND]
Inspect or control the Sigasi CLI daemon.
  -h, --help      Show this help message and exit.
  -V, --version   Print version information and exit.
Commands:
  status  Show the current daemon metadata, if present.
  start   Start the Sigasi CLI daemon.
  stop    Stop the Sigasi CLI daemon.
Start
$ sigasi-cli daemon start --help
Usage: sigasi-cli daemon start [-hV] [--daemon-idle-timeout=<d>]
                               [--project-idle-timeout=<e>]
                               [[-P=<key=value>]... [-D=<directory>]...]
Start the Sigasi CLI daemon.
      --daemon-idle-timeout=<d>
                           Idle time before the daemon process stops. Accepts
                             values like 2h, 1 day 3 seconds, 30s, or PT2H.
  -h, --help               Show this help message and exit.
      --project-idle-timeout=<e>
                           Idle time before an unused project session is
                             unloaded. Accepts values like 5m, 1 day, or PT1H.
  -V, --version            Print version information and exit.
Project Options:
  -D, --library-database, --dependencies-path=<directory>
                           Directory to search for project dependencies or a
                             library database. Can be used multiple times.
  -P, --path=<key=value>   Sets a custom path variable for a Classic project.
                             Can be used multiple times.
The project options accepted here (-P and -D) are the same as the project options for the verify command. They are fixed for the lifetime of the daemon. See License and Project Options below.
Status
$ sigasi-cli daemon status --help
Usage: sigasi-cli daemon status [-hV]
Show the current daemon metadata, if present.
  -h, --help      Show this help message and exit.
  -V, --version   Print version information and exit.
Stop
$ sigasi-cli daemon stop --help
Usage: sigasi-cli daemon stop [-hV]
Stop the Sigasi CLI daemon.
  -h, --help      Show this help message and exit.
  -V, --version   Print version information and exit.
License and Project Options
The daemon stores the license and project options (set via -P and -D) at startup time.
Passing different values to commands run against a running daemon has no effect.
To apply changed project options or a new license, stop and restart the daemon.
Similarly, if the license times out while the daemon is running, the daemon must be restarted.
Exit Codes
The Sigasi CLI should always finish with a 0 exit code.
If this is not the case, refer to the following table.
| Code | Description |
|---|---|
0 | Successful program execution. |
1 | Unhandled program exception occurred. |
2 | Invalid command line arguments / options. |
7 | Licensing error. Ensure a valid license is available. |
16 | Verification severity threshold reached. |
17 | Documentation export failed. |
18 | Compilation export failed. |
19 | Extraction of libraries failed. |
20 | Compilation recipe export failed. |
21 | Wrong project kind for this command. |
22 | Requested target does not exist. |
24 | Incorrect top level specified. |
130 | Command was cancelled, e.g., Ctrl-C or daemon client disconnected. |
Sigasi CLI usage with agents
The Sigasi MCP server allows VS Code Copilot & Cursor to use Sigasi’s strong deterministic functionality. However, any other platform (Claude Code, Mistral Vibe, Codex, etc.) or VS Code extension (Claude Code for VS Code, Mistral Vibe VS Code, etc.) cannot currently use the MCP server.
To support these platforms and extensions, use Sigasi CLI with the daemon option. First, ensure the CLI is available on your path. Then, ensure the daemon is started for much faster iterations.
sigasi-cli daemon startAs
sigasi-cliis embedded in the extension, it is readily available on the path of your VS Code terminal.
Now when instructing the agent, tell it to use Sigasi to complete the task.
Resolve all errors in project X and export the documentation. Use Sigasi.To ensure your agent always uses Sigasi, you can add instructions as below to your AGENTS.md or platform-specific AI instruction file, e.g., CLAUDE.md.
## HDL tooling: use Sigasi CLI

This project has HDL (Verilog/SystemVerilog/VHDL). Use the licensed `sigasi-cli`
for HDL-aware tasks — it does real semantic analysis; grep/generic linters don't.

- **After editing HDL**, verify the project (not just the file):
  `sigasi-cli verify <project> --json --fail-on-error`. Parse the JSON
  `issues` array — a non-empty array lists the real problems to fix. Never
  hand-roll HDL linting.
- **Format VHDL** with the tool, not by hand:
  `sigasi-cli format <files.vhd>`.
- **Don't guess compile order or dependencies** — export them as JSON:
  `sigasi-cli compilation-recipe <project>` (compilation order plus library
  mapping, language levels, and defines).
- **Docs**: `sigasi-cli document <project>`.
- **Vendor/verif libs** (Quartus, Vivado, UVM, UVVM): extract with
  `sigasi-cli extract ...` and pass `-D <library-database>`.
- Exit code 7 = feature not licensed — report it, don't disable checks.
- **Speed**: ensure the Sigasi CLI daemon is running. Check via
  `sigasi-cli daemon status`, start via `sigasi-cli daemon start`.
  Don't check unnecessarily.
Sigasi CLI usage in Continuous Integration (CI)
Refer to the following articles with step-by-step examples of how to use Sigasi CLI in CI:
- Sigasi CLI Code Verification in GitLab CI
- Sigasi CLI Code Verification in Jenkins CI
- Monitoring HDL code quality with Sigasi CLI and SonarQube
- Sigasi CLI as a Git Commit Hook
- Sigasi CLI Documentation with Jenkins and GitLab CI
Sigasi CLI with Unicode Characters
On Windows, the encoding of command-line arguments depends on the system locale. When using an English locale with Unicode characters (e.g., Japanese, Korean, Chinese) in file paths or arguments, these may not be encoded properly.
To resolve this, enable the Windows setting Beta: Use Unicode UTF-8 for worldwide language support which can be found under Control Panel > Region > Administrative > Change system locale…. Alternatively, use a system locale that matches the character set you’re working with.