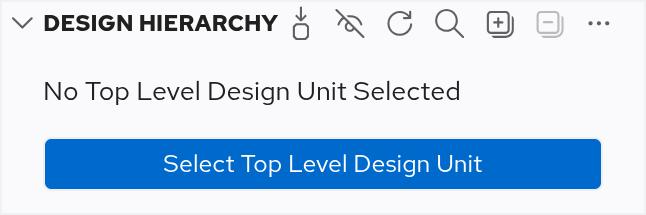
The Design Hierarchy View shows the hierarchy tree of the design. Initially, the view will be empty. To populate it, click on the Select Top Level Design Unit button to select a top level design unit for your project.
There’s also a  Select Top Level Design Unit button in the toolbar, a context menu item in the Libraries View, or you can use the Code Lens.
In any case, a Quick Pick pop-up window will show a list of all the available top level design unit candidates.
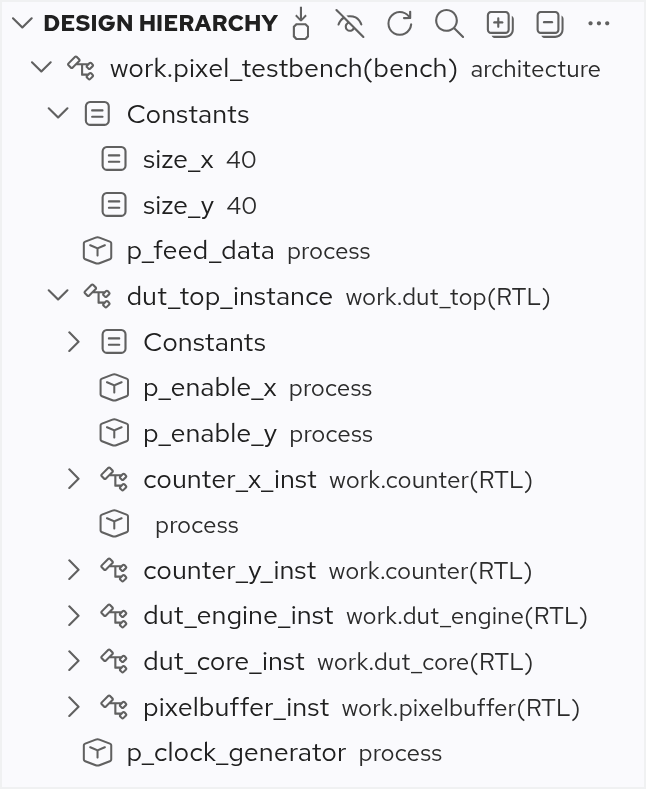
After selecting a design unit, the view will be populated with the structure of your top level and its children, including their constants, parameters, generics, and instances.
Select Top Level Design Unit button in the toolbar, a context menu item in the Libraries View, or you can use the Code Lens.
In any case, a Quick Pick pop-up window will show a list of all the available top level design unit candidates.
After selecting a design unit, the view will be populated with the structure of your top level and its children, including their constants, parameters, generics, and instances.
You can navigate to an element in the editor by double-clicking it.
If you want the selection in the Design Hierarchy View to follow your position in the editor, ensure that you enable Follow Cursor in the More Actions menu.
Buttons in the Design Hierarchy View
These buttons are available in the Design Hierarchy View:
-
Select Top Level Design Unit
- Only Show Instantiations (enabled)
- Only Show Instantiations (disabled)
- Refresh the Design Hierarchy View
- Search in the Design Hierarchy View
- Expand the full Design Hierarchy View
- Collapse the Design Hierarchy View
- More Actions
Clear Top Level: Clear the selected top level design unitFollow Cursor: Link the Design Hierarchy View with the editorAuto Refresh: Refresh the Design Hierarchy View automatically on code changesSort by: Position: Sort all elements by their position in the source codeSort by: Name: Sort all elements alphabeticallySort by: Category: Sort all categories (constants, instances, processes, etc.) alphabetically, then sort all their elements by position
Troubleshooting
Occasionally, you might encounter a No valid Top Level configured error in the Design Hierarchy View. This may happen when you rename the file or the top level design unit. In that case, you’d have to set the top level again.
