Universal VHDL Verification Methodology (UVVM) is an open-source framework designed to streamline the creation of structured VHDL testbenches, facilitating the verification of FPGA and ASIC designs. It provides a comprehensive library of verification components and utilities to help design teams reduce the effort and complexity involved in writing testbenches. If you are familiar with UVM , UVVM is UVM’s VHDL counterpart.
One can use UVVM at three different levels.
- The UVVM utility library provides logging, alert handling, checks, randomization, signal generators, and more.
- UVVM’s Bus Functional Models (BFMs) define single bus operations like
bus_read()andbus_write(). These remove the need to set individual bus signals (and basically re-implement the bus protocol) for every bus transaction. - VHDL Verification components (VVCs) provide modular testcomponents for complex designs.
In this article, we will demonstrate the use of the utility library and a predefined BFM in Sigasi Visual HDL. But before that, we’ll introduce our example design.
Example design
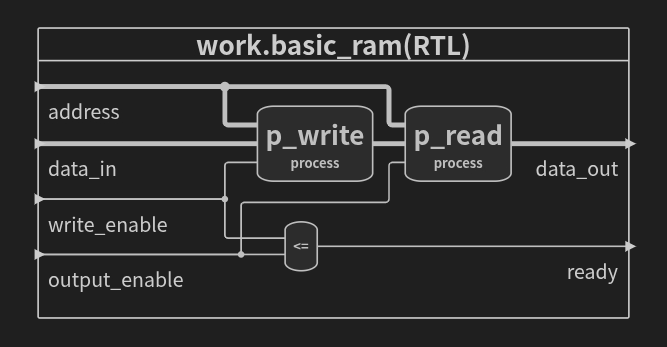
As an example Design Under Test, this article uses a simple memory. The initial DUT uses asynchronous read and write operations, but we’ll need to switch to synchronous writes later.
Testing memory is less trivial than one would expect at first sight. Proving that each write actually puts the data in the correct location and that a read operation can read the data correctly from the same location, is not enough. One must also prove that writing any value into any location doesn’t affect any data in other locations, and that reads don’t affect any stored data at all. In practice, exhaustive testing would take excessively long, so randomized testing is needed for good testcoverage.
VHDL code of the DUT and the UVVM testbenches is available on GitHub . We recommend opening the design in Visual Studio Code with the Sigasi Visual HDL extension. No Sigasi license is required, you can use the SVH Community Edition.
A basic testbench without UVVM
An initial testbench is written in plain VHDL. We’re showing a few code snippets here; the full code is available in the GitHub project mentioned above.
First of all, our initial testbench (tb_basic_ram.vhd) instantiates the Design Under Test (DUT) and generates a clock signal.
-- DUT instance
dut_inst : entity work.basic_ram
    generic map(
        ADDRESS_WIDTH => ADDRESS_WIDTH,
        DATA_WIDTH    => DATA_WIDTH
    )
    port map(
        address       => address,
        data_in       => write_data,
        data_out      => read_data,
        write_enable  => write_enable,
        output_enable => read_enable,
        ready         => open
    );
-- Clock generator
p_clk_gen : process
begin
    while true loop
        clk <= '0';
        wait for C_CLK_PERIOD / 2;
        clk <= '1';
        wait for C_CLK_PERIOD / 2;
    end loop;
end process p_clk_gen;
Then, it performs read and write operations to the DUT and checks the correctness of data read from the DUT.
v_addr := ...;
v_data := ...;

-- Write to memory
address      <= v_addr(iteration);
write_data   <= v_data(iteration);
write_enable <= '1';
wait for 2 * C_CLK_PERIOD;
write_data   <= (others => '0');
write_enable <= '0';

-- Read from memory
address     <= v_addr(iteration);
read_enable <= '1';
wait for 2 * C_CLK_PERIOD;
read_enable <= '0';

-- Check data
assert (read_data = v_data(iteration)) report "Incorrect data!" severity failure;
That’s pretty verbose for a single write-and-read-back operation, right? Apart from verbose, each read and write is a full implementation of the bus protocol. Duplication makes the code hard to maintain: each copy needs to be updated whenever there’s a change, which increases the risk of mistakes. Even using loops to reuse some of the code (e.g., to write zeros to the entire memory, or to write and verify a predefined sequence of values), the code remains annoyingly long and verbose.
We’re also missing randomization. The testbench will apply the same inputs every time, which limits testcoverage and makes it more likely that design flaws are missed.
Finally, if it takes significant effort to create and maintain a testbench, the test engineer may be inclined to keep the testcases and testbench simple, further limiting testcoverage and increasing the risk of a faulty design.
Using the UVVM utility library
The UVVM utility library offers functionality to address some of the shortcomings of plain VHDL testbenches. In order to use UVVM, all you need is a copy of the UVVM library , which you can download from GitHub, and a context statement in your testbench.
library uvvm_util;
context uvvm_util.uvvm_util_context;
In this section, we highlight a few examples of how UVVM’s utility library can facilitate and enhance a testbench. Using UVVM leads to a smaller (less code to write and maintain), more readable, and more versatile testbench: tb_basic_uvvm.vhd.
Setting up UVVM in Sigasi Visual HDL
Before using UVVM in Sigasi Visual HDL, you need to set it up as shown here.
Signal generators
A first handy function for our testbench is UVVM’s clock generator. Instead of writing a clock generator process, a single line suffices with UVVM.
p_clk_gen : clock_generator(clk, C_CLK_PERIOD);
Also for signals like reset (which we don’t use in our example), a helper function exists to generate a pulse:
gen_pulse(rst, 2 * C_CLK_PERIOD, "Pulse reset signal for 2 x clock period");
Randomization
Randomization is crucial to maximize test coverage without excessive simulation times. UVVM offers functions and procedures to generate random std_logic, std_logic_vector, integer and real numbers, and time.
Our initial testbench used a fixed sequence of addresses and data. With UVVM, we can randomize addresses and data, which improves testcoverage. The testcode looks simpler and becomes more scalable too: you don’t need to provide more addresses and data if you want to increase the number of random reads and writes.
for iteration in 0 to 7 loop
    -- Randomize stimuli
    v_data := random(C_DATA_BITS);
    v_addr := random(C_ADDRESS_BITS);

    -- Write data to memory
    -- Read back data
    -- Check correctness
end loop;
Logging, reporting, and alerts
UVVM comes with an extensive logging and reporting framework to facilitate both generating and filtering log messages.
log(ID_SEQUENCER, "Write 0x" & to_string(v_data, HEX) & " to address 0x" & to_string(v_addr, HEX), C_SCOPE);
The log function logs each message with a particular message ID and a scope. Based on ID and scope, the user can turn logging on or off to filter out the log messages that they’re interested in. For example, when debugging a particular part of a design, the designer enables verbose messages from that part of the design, while for regression testing, you probably don’t want verbose logs.
UVVM alerts too are an improvement over VHDL’s reports. The alert level is more fine-grained than VHDL’s severity level. In UVVM, the user can configure that the simulation should fail only after a certain number of alerts and not after the first one. One could think of accepting a few warnings near the start of a simulation, when some signals are not initialized yet, but terminating if more fundamental warnings show up later in the simulation. Alerts send their log messages to UVVM’s flexible logging system.
alert(WARNING, "Uninitialized signal xyz")
Finally, UVVM offers reporting functions which can add an overview of, e.g., alerts at the end of a simulation.
report_alert_counters(FINAL);
Checking values
UVVM offers a number of functions to facilitate checking the correctness of the DUT’s output. These functions encapsulate checking values and reporting problems and are a replacement of VHDL assertions. UVVM check-functions use UVVM alerts and logging to report discrepancies. Function check_value can operate on different data types, including std_logic[_vector] and its subtypes, numeric types, booleans, and time.
check_value(read_data, v_data, ERROR, "Check memory data", C_SCOPE);
Back to our example
The body of the main process of our testbench now looks like this. Data are randomized, activity is logged, values are checked, and a report is generated at the end.
-- Test: perform a sequence of random writes and read backs to/from memory
for iteration in 0 to ITERATION_COUNT - 1 loop
    -- Actual random data this time
    v_data       := random(C_DATA_BITS);
    v_addr       := random(C_ADDRESS_BITS);

    -- Write to memory
    log(ID_SEQUENCER, "Write 0x" & to_string(v_data, HEX) & " to address 0x" & to_string(v_addr), C_SCOPE);
    address      <= v_addr;
    write_data   <= v_data;
    write_enable <= '1';
    wait for 2 * C_CLK_PERIOD;
    write_data   <= (others => '0');
    write_enable <= '0';

    -- Read from memory
    log(ID_SEQUENCER, "Read from address 0x" & to_string(v_addr, HEX), C_SCOPE);
    address     <= v_addr;
    read_enable <= '1';
    wait for 2 * C_CLK_PERIOD;
    read_enable <= '0';

    -- Check data
    check_value(read_data, v_data, ERROR, "Check mem data", C_SCOPE);
end loop;
wait for 100 ns;

-- UVVM summary report
report_alert_counters(FINAL);
UVVM generates nicely formatted simulation output, with a summary of alerts at the end.
# UVVM:
# UVVM: ***  TB_NOTE #1  ***
# UVVM:             0 ns   TB seq.
# UVVM:                    Starting testbench_util
# UVVM:
# UVVM: ID_SEQUENCER                      20.0 ns  TB seq.(uvvm)                  Write 0x47 to address 0x00010100
# UVVM: ID_SEQUENCER                      40.0 ns  TB seq.(uvvm)                  Read from address 0x14
# UVVM: ID_POS_ACK                        60.0 ns  TB seq.(uvvm)                  check_value() => OK, for slv x"47"'. 'Check mem data'
# UVVM: ID_SEQUENCER                      60.0 ns  TB seq.(uvvm)                  Write 0x3B to address 0x00100101
# UVVM: ID_SEQUENCER                      80.0 ns  TB seq.(uvvm)                  Read from address 0x25
# UVVM: ID_POS_ACK                       100.0 ns  TB seq.(uvvm)                  check_value() => OK, for slv x"3B"'. 'Check mem data'
... ...
# UVVM:      ===============================================================================
# UVVM:      *** FINAL SUMMARY OF ALL ALERTS ***
# UVVM:      ===============================================================================
# UVVM:                                REGARDED   EXPECTED  IGNORED      Comment?
# UVVM:                NOTE         :      0         0         0         ok
# UVVM:                TB_NOTE      :      1         1         0         ok
# UVVM:                WARNING      :      0         0         0         ok
# UVVM:                TB_WARNING   :      0         0         0         ok
# UVVM:                MANUAL_CHECK :      0         0         0         ok
# UVVM:                ERROR        :      0         0         0         ok
# UVVM:                TB_ERROR     :      0         0         0         ok
# UVVM:                FAILURE      :      0         0         0         ok
# UVVM:                TB_FAILURE   :      0         0         0         ok
# UVVM:      ===============================================================================
# UVVM:      >> Simulation SUCCESS: No mismatch between counted and expected serious alerts
# UVVM:      ===============================================================================
While the testbench has improved already with respect to plain VHDL, it is obvious that setting the individual bus signals for each operation is still clumsy. In the next section, we’ll see how a BFM can improve that.
Using a Bus Functional Model
A Bus Functional Models (BFM) is a procedure that handles low-level signal handling, making it much easier to write and maintain testcode. Instead of re-implementing the bus protocol each time, procedure calls like bus_read() and bus_write() provide a convenient way to execute bus transactions.
UVVM provides BFMs for a range of popular buses, including Avalon, AXI, I2C, SPI, etc. In our example, we’ll use the Simple Bus Interface (SBI), a simple single-cycle parallel bus which is well-suited for our DUT. With the BFM, we can replace the write and read operations with procedure calls to sbi_write() and sbi_read(). In addition, we can replace the sequence of sbi_read() and check_value() with sbi_check(). The main loop of our test is now reduced to this.
for round in 0 to ITERATION_COUNT - 1 loop
    v_data := random(C_DATA_BITS);
    v_addr := random(C_ADDRESS_BITS);

    sbi_write(unsigned(v_addr), v_data, "Write data to memory", clk, cs, u_address,
        read_enable, write_enable, ready, write_data, C_SCOPE);
    sbi_check(unsigned(v_addr), v_data, "Check data in memory", clk, cs, u_address,
        read_enable, write_enable, ready, read_data, scope => C_SCOPE);
end loop;
The loop is now reduced to contain just a couple of statements. BFM procedure calls take care of the bus protocol at the bit level, as well as checking results and reporting. The code has become much easier to write, maintain, understand and extend. In fact, if it’s this easy to write testcode, what would stop us from creating a more extensive testbench? We’ll create a testbench which
- initializes the entire memory with all zeroes,
- performs a large number of random writes and read-backs, and
- reads back the entire memory at the end, ensuring that the memory content is fully as expected.
You can check out the full testbench (tb_bfm_uvvm.vhd) on GitHub .
As in the previous example, UVVM produces a nicely formatted log of the simulation. Filling the memory with all zeroes, and performing a series of write-and-read-back operations works nicely.
# UVVM: ID_BFM                            32.5 ns  TB seq.(uvvm)                  sbi_write(A:x"00", x"00") completed. 'Write data to memory'
# UVVM: ID_BFM                            42.5 ns  TB seq.(uvvm)                  sbi_write(A:x"01", x"00") completed. 'Write data to memory'
# UVVM: ID_BFM                            52.5 ns  TB seq.(uvvm)                  sbi_write(A:x"02", x"00") completed. 'Write data to memory'
# UVVM: ID_BFM                            62.5 ns  TB seq.(uvvm)                  sbi_write(A:x"03", x"00") completed. 'Write data to memory'
... ...
# UVVM: ID_BFM                          2572.5 ns  TB seq.(uvvm)                  sbi_write(A:x"FE", x"00") completed. 'Write data to memory'
# UVVM: ID_BFM                          2582.5 ns  TB seq.(uvvm)                  sbi_write(A:x"FF", x"00") completed. 'Write data to memory'
# UVVM: ID_BFM                          2592.5 ns  TB seq.(uvvm)                  sbi_write(A:x"14", x"47") completed. 'Write data to memory'
# UVVM: ID_BFM                          2602.5 ns  TB seq.(uvvm)                  sbi_check(A:x"14", x"47")=> OK, read data = x"47". 'Check data in memory'
# UVVM: ID_BFM                          2612.5 ns  TB seq.(uvvm)                  sbi_write(A:x"25", x"3B") completed. 'Write data to memory'
# UVVM: ID_BFM                          2622.5 ns  TB seq.(uvvm)                  sbi_check(A:x"25", x"3B")=> OK, read data = x"3B". 'Check data in memory'
# UVVM: ID_BFM                          2632.5 ns  TB seq.(uvvm)                  sbi_write(A:x"22", x"93") completed. 'Write data to memory'
# UVVM: ID_BFM                          2642.5 ns  TB seq.(uvvm)                  sbi_check(A:x"22", x"93")=> OK, read data = x"93". 'Check data in memory'
... ...
# UVVM: ID_BFM                          2872.5 ns  TB seq.(uvvm)                  sbi_write(A:x"6B", x"65") completed. 'Write data to memory'
# UVVM: ID_BFM                          2882.5 ns  TB seq.(uvvm)                  sbi_check(A:x"6B", x"65")=> OK, read data = x"65". 'Check data in memory'
# UVVM: ID_BFM                          2892.5 ns  TB seq.(uvvm)                  sbi_write(A:x"1F", x"1C") completed. 'Write data to memory'
# UVVM: ID_BFM                          2902.5 ns  TB seq.(uvvm)                  sbi_check(A:x"1F", x"1C")=> OK, read data = x"1C".
But hey, what’s that?
But then, we found this in the simulation log. Right at the start of the third part of our test, i.e. reading back and verifying the content of the entire memory, an error is flagged for the data at location zero.
# UVVM: =========================================================================================================================================================================
# UVVM: ***  ERROR #1  ***
# UVVM:        2912.5 ns   TB seq.(uvvm)
# UVVM:                    sbi_check(A:x"00", x"00")=> Failed. Was x"1C". Expected x"00".
# UVVM:                    'Final check of data in memory'
# UVVM:
# UVVM: Simulator has been paused as requested after 1 ERROR
# UVVM: =========================================================================================================================================================================
What is going on? It looks like the data at location 0x00 is the same as what we’ve written in the last write-and-read-back operation to address 0x1F.
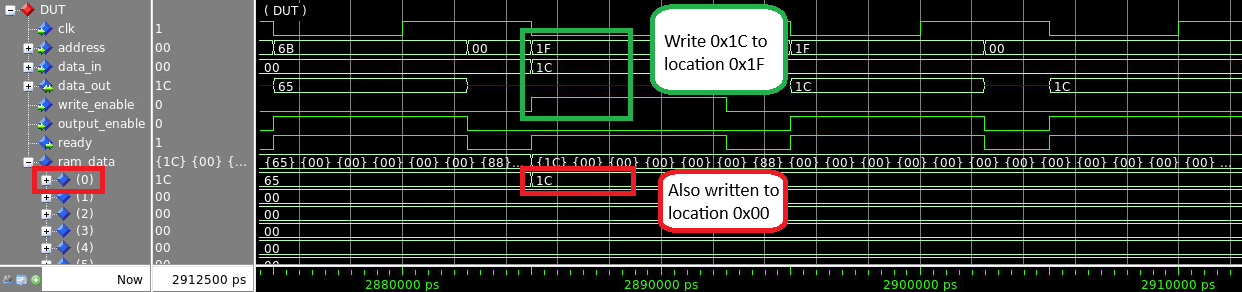
A quick check in the waveforms reveals that every write operation writes the data to both location 0x00 and to the expected memory location.
Looking into the SBI bus specification , the SBI protocol expects that writes happen on the rising clock edge, and not asynchronously as we were doing. After changing the write interface of our memory to a synchronous one, the simulation runs correctly. In tb_bfm_uvvm.vhd, check for this line and change FALSE to TRUE:
constant SYNCHRONOUS_WRITE : boolean := FALSE;
# UVVM:      ====================================================================================================================================================================
# UVVM:      >> Simulation SUCCESS: No mismatch between counted and expected serious alerts
# UVVM:      ====================================================================================================================================================================
Using UVVM in Sigasi Visual HDL
In this section, we will highlight Sigasi Visual HDL (SVH) features that are particularly useful when working on UVVM testbenches.
First of all, SVH has built-in support for the UVVM library. When you add the UVVM library to your project, as shown in this article, SVH recognizes that the new library is a UVVM library, and will configure it correctly.
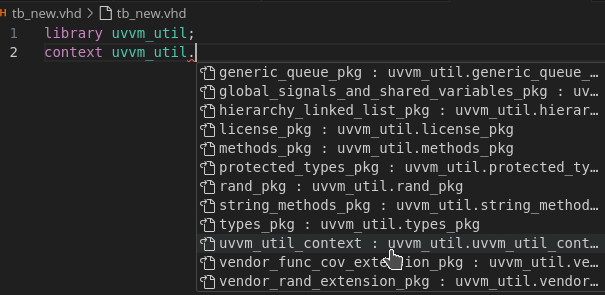
Once the UVVM library is set up, SVH’s Content Assist will help you write different UVVM constructs, like library and context clauses, and procedure and function calls. As soon as you type uvvm in an empty VHDL file, the Content Assist will offer to auto-complete the library clause. Press <enter> to accept.

The same goes for the context clause:
After accepting a second time, the code looks like this:
library uvvm_util;
context uvvm_util.uvvm_util_context;
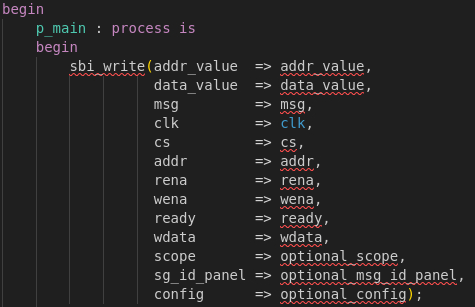
You can use Content Assist to auto-complete function and procedure calls. Use arrow-down and
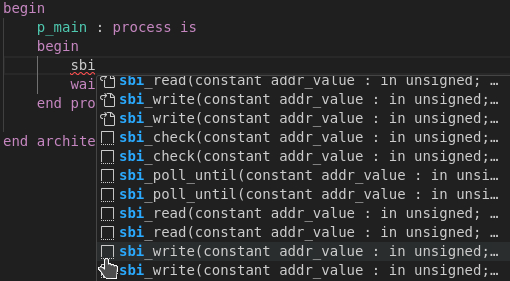
The completed code uses name binding for the arguments, which makes it easy to put each argument in the right place.
SVH’s Signature Helper for functions and procedures is a great help when you are dealing with existing code. Place the cursor anywhere in the arguments list and type Ctrl+Shift+Space to open the signature helper pop-up. This is a great help to figure out problems with arguments. If multiple functions exist with the same name but different arguments (known as function overloading ), you can switch from one from to another using the arrow keys.

Conclusion
In this article, we have introduced UVVM’s utility library and Bus Functional Models. UVVM facilitates the creation and maintenance of VHDL testbenches. In addition, we have shown that Sigasi Visual HDL is a powerful tool to create UVVM testbenches.